Showing posts with label decorations. Show all posts

Monday, 6 December 2010

Kitchen/Living room Christmas decorations

We spend most of our time in our kitchen/living room but our Christmas tree is set up in the lounge room.  A couple of years ago I decided in addition to our Christmas tree, to put up decorations in the kitchen/living room  where I can see Christmas cheer while I'm working.


I found some fallen branches from a tree in the front garden and spray painted them lightly with white paint.  I tied them together with Christmas ribbon and placed them in a tall vase.  Some years I use pebbles to keep the branches in place, this year I used crepe paper inside the vase.  We have a selection of silver and blue decorations, tinsel, baubles, some little silver stars, hearts, some teardrop decorations and beaded icicles.  It's a more contemporary style display but I like the contrast to the traditional Christmas tree in the lounge room.


In the next post (just have to draw a name out of the hat) I will be announcing the winner of my give away.  Stay tuned.

Anne  xx

Friday, 3 December 2010

Musings, creativity and a question

 Even though I've taken a few days break from blogging, that certainly doesn't mean I've been idle.  I had a bit of a meltdown last weekend, a culmination of a number of things and as I'm somewhat recovered, I have a few things to share and a questions to ask.  It's going to be a  long post.

Miss G. has finished the school year (sigh of relief), and is now on holidays which in part means I get a break too.  No more school drop offs and pick ups for about 2 months.  BLISS.  One more year of school and then she has finished.  She can then contemplate uni and a more adult life without quite so much parental involvement needed.  I really wonder how parents with more than two children continue the momentum.

Back to blogging.  I've continued reading all the blogs I follow and especially related to this post by Terrie at Creative Haven.  I was confronted by my huge mess a couple of days ago when a cousin of my husband's was in town with her husband and they wanted to catch up.  An invite to dinner was given and that meant I had to confront the shambles and disorganisation of my house.  I had never met this cousin before and I'm afraid my pride would not let me welcome them into a grotty house.  This forced me to do many things I haven't done for so long like wash the windows covered in dog slobber, put things away where they belong, wiping down cupboard doors in the kitchen, folding up blankets from my nephews visit and putting them back in the linen cupboard.  And the list goes on.  It was actually very good for me to be forced to do these things as I now have a relatively tidy environment in which to live and it's very nice.  I love looking out clean windows. Fancy that!

My general clean up included by my side of the bedroom which was an eyesore of books, magazines, Christmas  shopping, shoes and .....wait for it........DUST BUNNIES.  There was also the bedside table which was covered in clutter, including pens, pencils, pens, pencils, pens, pencils, you get the idea.  Contrary to my messy living habits, I like to have things organised (figure that one out?), somewhere to put things.  So I had an idea for a no sew pen, pencil holder.  Here's what I did.
.
Materials
small scrap of fabric
ribbon
pinking shears
double sided tape
jam jar
and the offending pens, pencils of course
Measure the size of the jar and cut enough fabric for an over lap when you wrap it around the jar.
Place two pieces of double sided tape on the right side of the fabric at one end.

Place the jar on the fabric with the double sided tape facing up and roll jar toward you, pressing the down on the overlap of fabric.
Add some ribbon and tie in a bow.
Place your pens and pencils in and there you have it, a pretty solution for a untidy problem.  Bedside table now looks gorgeous.
For all the people who like to decorate with neutral colours, using hession or burlap, calico, raffia, twine, or even a ribbon made from a strip of ticking that has been frayed would look nice.  Embellishments could be added too.  Oh, I've just had another thought.   How about making one of these with a Christmas theme to put your candy canes in if your aren't hanging them on the tree?  Might just have to make one of those too.

Someone else who benefitted from my bedroom clean up was Leanne, she can now be seen and admired again.  She is my teddy and I've had her since I was a baby, so she's 48 like me. 

 She use to be a soft blue.  A bit of rolling around in Western Australian dirt soon changed that as you can see.    When I was little, I attempted to improve her looks with blue eyeshadow above her left eye.  I used chalk.  :)  She is sitting on a very old stool which was made by my Grandfather.  I remember sitting on it when I was about 4 or 5 years old with my Granny next to me while we watched kid's t.v. 

I've made a few other things in the last couple of days.  A christmas tree decoration.
I made two different size bird templates, cut two large birds from blue hessian and two small birds from fabric scraps.  I wanted this to be a double sided ornament.  I hand sewed the pieces together using embroidery floss with the ribbon loop being sewn in between the hessian pieces as I went.  I added some rhinestones for a bit of bling.

I've also made this Christmas tree from a poly styrene cone.
I covered it with a curtain fabric sample and glued silver glittery ric rac on the sides.  To cover the bottom of the tree, I used three pieces of white and silver Christmas ribbon and joined them together by sewing gathers at intervals where the silver ric rac is positioned.  Apart from the gathered stitches used on the ribbon, I used a hot glue gun to hold everything down and together.  I love my very new hot glue gun.

Now for the question.  I'm sorry to go on about this, but I really am confused.  When my 100th post was up, I decided like most people seem to do in blog land, to have a give away to celebrate this small milestone.  I made four items which I hoped would have some appeal.  But as only two people have put their name forward (thank you ladies), I can only assume that this is not the type of fare people are interested in receiving.
There are many blogs out there who offer truly gorgeous things in give aways.   Some items are bought and  some are hand made, so I thought my hand made offerings would be acceptable.  So if you wouldn't mind, could you please enlighten me as to what constitutes a good give away.  You may not wish to comment publicly on this topic and I would be very happy to receive an email for you.  Please be honest, I will take no offense.   And please don't suddenly enter my giveaway because you feel sorry for me.  I'm not the kind of person that needs to be propped up that way.  That being said, if you missed my post and like my give away items, please enter. :)  Give away closes 5th December.

Have a gorgeous day/evening everyone,
Anne  xx

Monday, 15 November 2010

White and neutral style Christmas baubles

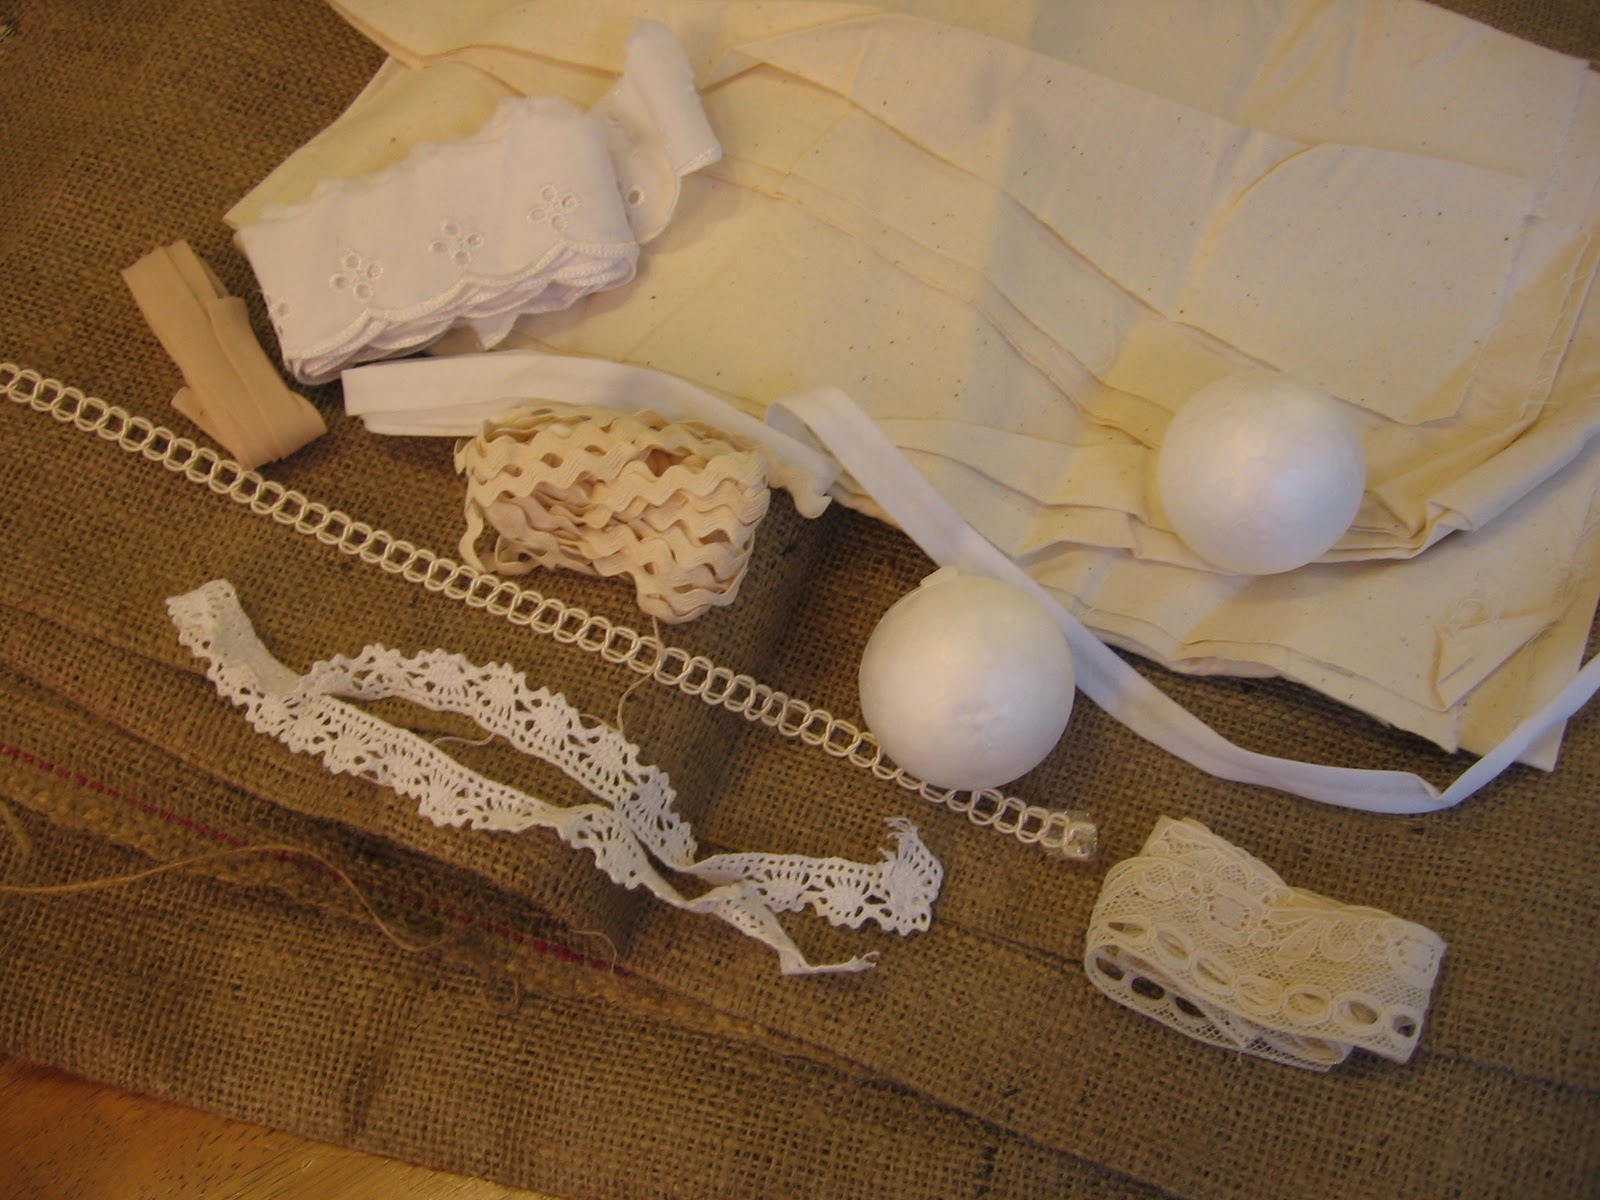
As you can see I've been on a creating frenzy the past few days.  I wanted to try something a little different when it came to making some more baubles and I know there are many people who favour decorating their houses with whites, off whites and neutral colours.  Using bits and pieces I already have I came up with the following baubles.

Materials
hessian 
unbleached calico
embroidery anglaise
vintage ric rac inherited from my mum-in-law
vintage bias binding also inherited from mum-in-law
vintage lace
ribbon
braid
poly styrene foam balls
sew pins (of course)
scissors
I didn't use all the materials shown above but it shows a selection of what you could use.  The photos below show baubles at different stages of construction using the same method as my previous post.
 The finished baubles.


Have a lovely day everyone.

Anne

Sunday, 14 November 2010

Another Christmas project

Yesterday I was wandering around the shopping centre getting a few bits and pieces for Christmas.  You know things like crackers to make my own Christmas bon bons and a few gifts that I can't make myself.  As I was under no time constraints, I had a lovely browse.  In many of the shops with gifts and decorations, I saw Christmas words like, Joy, Peace, Noel, etc. made from wooden letters and decorated with glitter.  They were really pretty but I wasn't prepared the price the shops were asking so I went about making one myself.

Materials
strong card
pencil
eraser

 scissors
craft knife
glue stick
craft glue
small timber off cut
saw
folk art paint
glitter
2 small (cheap kids) paint brushes
3 paper plates or other suitable containers for holding glue and glitter
self healing mat or other protective surface
newspaper

First draw  the word of your choice onto a piece of card. 
Carefully cut out the word using a small pair of scissors and a craft knife to get into the small corners. 
I've used card I saved from some packaging which is white on one side and beige on the other.  I've drawn the word on the white side so that the beige colour won't show through the glitter.
Turn the second piece of card with the beige side up and trace around the letters.
Cut out the word.  You now have two words that are a mirror image.
Glue the two beige sides together (I used a glue stick so glue wouldn't ooze out), then trim any overhang.
 
 Put the glitter on a wide plate.
Using a small  paint brush, paint glue on one side of the word, including the edges.

Hold the word over a clean plate and tip the glitter over the side with the glue on.  This may take several attempts as you seem to have glitter sliding off everywhere.  Next time I would probably use a shallow tray for the glitter and then you could press the glitter into the card and stop so much coming off. 
Allow the first side to dry, then glue the other side of the word and cover with glitter.
Allow to dry completely.
While the word is drying, get your small wood off cut and measure the length a little longer than the word and cut.  Saw a small groove in the top of the wood so you can stand your glittery word up.  Make sure the groove is not wider than the two pieces of card glued together otherwise your word won't stand up.  Sand the wood and then paint.


When the wood is dry, insert your words into the groove and there you have it, Christmas words to display.
My glittery word is being kept company by two little Christmas birds who flew home with me Saturday afternoon.

Before starting a project like this, prepare for glitter to get everywhere no matter how careful you are.  Everything I used for this project I had at home.  The card was packaging saved from a fabric pack.  Glitter, craft glue, cheap paintbrushes saved from when the girls were little.  The other craft tools like scissors, craft knife, self healing mat are already part of my craft supplies.  The glue stick is always on hand for Miss G's school assignments.  I sketch so I already have a supply of pencils.  The folk art paint was leftover from a previous project from a few years ago and we always have newspaper or old magazines on hand to use to protect the table.  The timber off cut came from hubby's supply in the garage.  He never throws things away so he is a very good source for bits and pieces.  He very kindly cut the timber, sawed the groove and sanded it for me.  I am quite capable of doing those things but I think he either gets a kick out of being involved or doesn't want me using his tools.  :-)

This had been another long post, thanks for your patience.

Have a good week.

Anne


Tuesday, 12 October 2010

Mixed bag

Hubbie made rather a disappointing discovery on Saturday.  The solar dragonfly lights Miss C. bought me for my birthday have started to rust so we've had to take them down.  They've only been out in the elements for a couple of weeks and when you read on the box that something is for outside use only, you don't expect it to rust.  I've got quite use to having little solar lights hanging in my garden room that I just couldn't do without some. 

Can you see those bright and colourful Chinese lanterns?  They are solar powered, are nylon and plastic so they'd better not rust!!!!  They look so cheerful out there swaying in the breeze.  We are in for another spring storm this afternoon, so it will be interesting to see how they stand up to the elements.

In our front yard we have the most glorious rhododendron tree that has just started flowering.
It was so windy while I was taking this photo I had to hold onto a leaf.

Stripey puss decided to join me in the front yard.
He likes to play a game with me where I pluck a lawn daisy, throw it up in the air and he tries to catch it and he usually succeeds too.

Here is our front yard view with two sycamore trees, bluebells and a camellia in the background with two flowers still in bloom.  You have to look hard.

Finally, my flower mosaic oil painting update.

Yesterday I worked on blocking in the lower right hand section and the started work on refining the flowers in the top left hand section.  I'm still trying to convince my teacher that I want this to be a loose painting.  I don't think she understands because I've always painted highly detailed images.  Next week perhaps.

Hope you are all having a great Tuesday.

Anne

Wednesday, 29 September 2010

The garden room

I love gardening and as I started this blog in winter I've mostly posted about ungardened moments.  However, spring is upon us in the southern hemisphere so it's time to start thinking about what awaits outside.  We live on a block of land that is roughly 1/4 of an acre in size which gives me lots of room to play with plants and garden decoration.

For some time I have yearned for a garden room.  Not a closed in room with brick walls and windows but an illusion of a room in the garden.  When hubby asked me last year what I would like for my birthday, I said a garden room, so he made me one.  It is still evolving into what I would like it to be, but I'm enjoying the process.

Here are some images of what took place in the process of making this lovely space just for me.  First we had to sand down the garage wall and repaint.  Facia and guttering have since been replaced.  As the land is slightly sloping, hubby had to dig out soil and level the ground.  This was a lot of hard work for him.  A layer of sand went down and then pavers arranged and cut to size.


I put some chairs and a table on the unfinished paved area so I could imagine what it would be like.

Next holes were dug for posts.

Poles are now in the ground and the top beams in place.  Between the stages of the photo above and below, hubby had a trip to the local hospital emergency room with a cut to the top of his head after something rather sharp and heavy fell on his head.  There was a lot of blood as with all head wounds and three stitches were required.  I'm pleased to report no lasting damage occurred .

Top bracing beams on, facia and guttering replaced.


At this stage I'm starting to get very excited and can't stop myself from putting plants and decorations in already.

I've planted Australian native climbers near the posts and hubby has installed a bamboo screen roof sun shelter.

Lattice added to one side of the room to give the illusion of privacy.  :-)


Voila. Structure complete.  Decorations and plantings ongoing.


Since the above photo was taken last year, the climbers have climbed, more decorations have been added and the bamboo roof shelter needs replacing thanks to a brutal hail storm earlier this year.  Have a look at these hail stones.


We had some damage with a broken bedroom window, smashed laserlite roofing over the pergola and hubby's car was unfortunately written off it was dented so badly.  The broken window was fixed the same night as the storm and the car has since been replaced.  We are just waiting for some fine weather to replace the bamboo roof on the garden room and laserlite on the pergola.  However the pergola is going to be totally remodeled to provide more shelter in winter so we would have needed more laserlite roofing for the new plan.  Thank goodness for insurance!  I'll post an updated photo of the garden room when it's looking it's best. 

Thank you to my lovely hubby for making me such a wonderful space to sit in summer to have a cuppa, read or just enjoy the sunshine and garden.


Anne  xx